Ricko 1/18 Vector W8 rebuild and improve WIP

Modifiers corner! Post your latest creations, your "how to" tips and tricks. Custom model and parts development too.
User avatar
Zondaracer
.
.
Posts: 425
Joined: Wed Feb 04, 2015 8:11 am
Location: Friesland, Netherlands

Ricko 1/18 Vector W8 rebuild and improve WIP

Post by Zondaracer » Fri Apr 14, 2017 6:49 pm

14 april 2017 kick off.
As a youngster I had 2 posters above my bed, a white Lamborghini Countach and a silver (or dark silver) Vector W8. That was a long time ago. During a discussion with someone about the first American supercar (Acura claims it was the first with the NSX, ha!) memories about that mighty car popped up. Ofcourse the Vector is the first American supercar and most special one is the W8. They made less than 20 when a hostile take over forced the resignation of founder and designer Jerry Wiegert. He took the rights of the W8 with him, so the new owners were left empty handed. They tried it with a rebodied Lamborghini which was awful and soon the company went into oblivion.
Those 18 or 19 cars are still iconic treasured pieces and occasionally appear on shows or cars and coffee events. Suprisingly if they come at auction, hammerprices are around a measly 300000 usd.

So I needed a model of a W8 desperately. Only an older model from Ricko in 1/18 scale is available and they are rare as hens teeth. New ones sell for over 120 usd/euro on Ebay, about triple the original price. Secondhand ones are rare, I tried to get a dusty one on Ebay, but was outbid with a selling price of almost 70 euro. wow. Luckily I found on a site for second hand items an equally dusty W8 and it changed hands quickly for 50 euros.

The Ricko Vector W8:
Image
Tatty paint, bad fitting parts and motor hatch, wheels too much chrome, missing wiper (and I broke the other one).

Image
Stance not right, needs to be lowered and aft wheels increase track.

Image
Mouse grey flocking on the floor must be black, dash needs detailing.

Image
Crooked spoiler (they all have it). Is the first design slotted spoiler (2 wings).

Image
Ill fitting lights, old design with orange indicators.

Image
Body of chassis, reasonable simple to do.

Image
Engine needs detailing, errors as intercooler intake and exhaust pipes connected (WTF?). This is the old design with double intake manifold, all cars have nowadays a single intake manifold with single intake hose off the intercooler. On the todo list.

Image
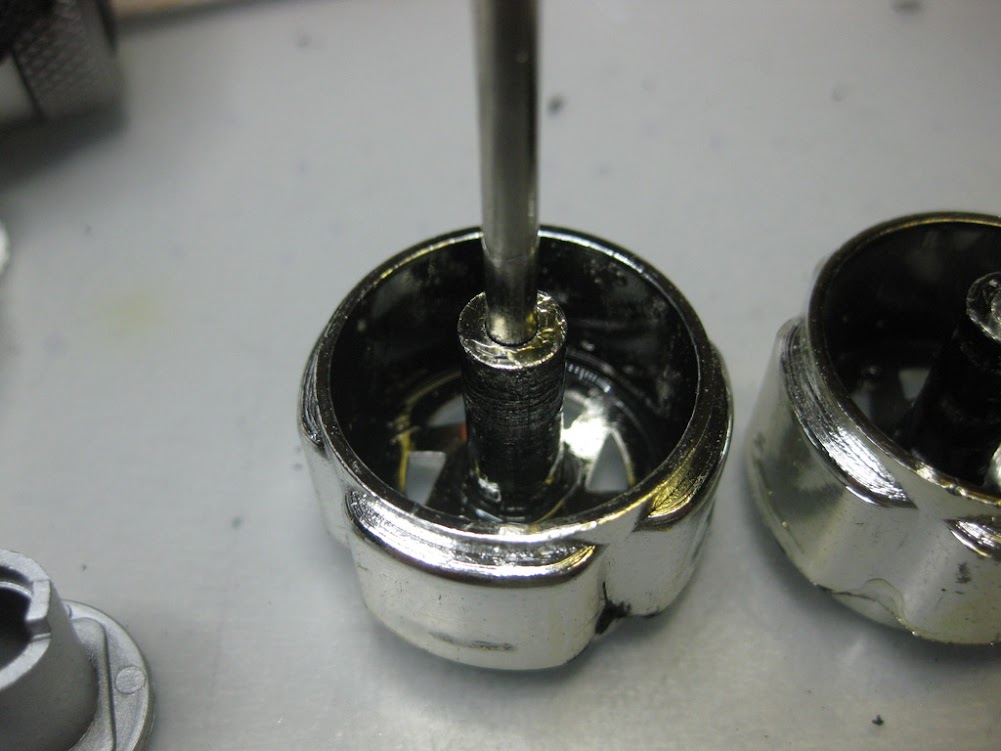
Engine in parts, lots of stuff to play with. I can relate most items, but some parts are questionmark. I need further study of the engine.

Image
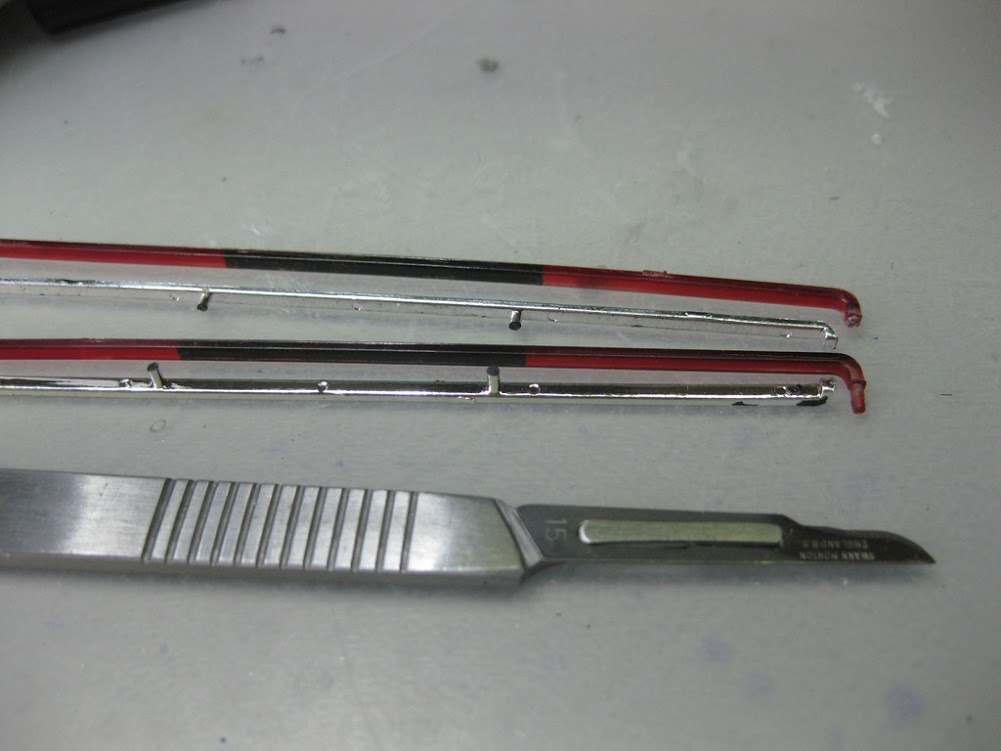
This was a tricky one, the aft strips with tail lights. Needed carefully cutting loose (many small items are glued).

Image
Couldn't get the rear wheels loose (front ones are easy, with a screw). so cut the axle in half inside the diff.

Image
This is the reason they won't come loose. Axle glued into wheel over large distance.

Image
Interior parts, flocked floor is separate item. Not sure what to do with it. Flock with black or just paint?

Image
This car is the goal. Silver (maybe paint dark silver), big single wing, updated mirrors with air intakes, toned down wheels, front bumper lights updated (no visible orange part), 2 tone seats (light grey/dark grey).
TBC
Last edited by Zondaracer on Sat Jul 01, 2017 5:24 pm, edited 2 times in total.

robs model cars
Posts: 44
Joined: Thu Jan 05, 2017 5:58 am
Location: Queensland, Australia

Re: Ricko 1/18 Vector W8 rebuild and improve WIP

Post by robs model cars » Fri Apr 14, 2017 6:59 pm

The W8 is a unique car for sure, definately has 80's written all over it. You have yourself another challenge here with this build using the Ricko.

User avatar
[KRAFTIG]
.
.
Posts: 32754
Joined: Sun Jun 17, 2012 9:08 am
Location: Canada
Contact:

Re: Ricko 1/18 Vector W8 rebuild and improve WIP

Post by [KRAFTIG] » Fri Apr 14, 2017 8:27 pm

Nice! Definitely flock with Black! :popcorn:

User avatar
[KRAFTIG]
.
.
Posts: 32754
Joined: Sun Jun 17, 2012 9:08 am
Location: Canada
Contact:

Re: Ricko 1/18 Vector W8 rebuild and improve WIP

Post by [KRAFTIG] » Fri Apr 14, 2017 11:57 pm

You inspired me to take my sample out for a new photo shoot. Guess what, the rear hatch broke off at the hinges. I guess diecast cancer or something of that nature set in. Off to find another example :wall:

Image

spikyone
Posts: 64
Joined: Tue Jun 09, 2015 9:24 am

Re: Ricko 1/18 Vector W8 rebuild and improve WIP

Post by spikyone » Fri Apr 21, 2017 7:52 am

Another masterpiece in the making! I'll be interested to see how this turns out, as it seems this is far more crude as a base model than even the Zondas or GT90. Good luck!

User avatar
Zondaracer
.
.
Posts: 425
Joined: Wed Feb 04, 2015 8:11 am
Location: Friesland, Netherlands

Re: Ricko 1/18 Vector W8 rebuild and improve WIP

Post by Zondaracer » Sat Apr 22, 2017 4:11 am

Update 22 April 2017
I have stripped and analysed the model. There is more wrong with the model than I anticipated. I have made a video in which most problems are discussed:
https://youtu.be/LIyuVLNo8is

Body:
- remove engraved line between nose and front spoiler, smooth transition from front spoiler to nose.
- remove or decrease joint line on front fender, on the real car it is hardly visible on photo's.
- nose air extractors revise curve of panels.
- smooth rear fenders and transition, on the model it is too bold and square.
- engine hatch replace doglegs by hinges or smaller design doglegs.
- open vent holes in side and sills.
- general fit and finish, remove indents, blemishes and adjust moving panels for gapwidth.
- replace crooked rear spoiler parts and make single wing.

Windows:
- remove studs and polish
- black stripes on inside
- tint green (just front and roof)
- add detail on side windows (cable for electric moving part)

Interior:
- seats 2-tone
- new carpet
- scratchbuild handbrake and pedals
- new safetybelts
- dash upper part grey
- scratchbuild circuit breakers on dash

Engine:
- scratchbuild single intake manifold
- rework turbo piping
- detail wires, leads, hoses, stainless etc.
- rework exhaust and heatshield

Suspension:
- lower and increase trackwidth
- smooth brake discs
- add parking brake
- sand tires

Small stuff:
- add air intake to mirrors
- rework or replace bumper- and head-lights, in retrospect I realised they didn't move the headlights aft, but up. The lights are horizontally placed while the nose skews down.
- new windshield wipers
- add 3rd brake light in/on engine hatch

That's basically it. I am building a decal sheet at the moment and figuring out how to make the engine hatch work. Then do all the body work and determine stance of the model. TBC.
Last edited by Zondaracer on Sat Apr 22, 2017 7:24 am, edited 1 time in total.

User avatar
[KRAFTIG]
.
.
Posts: 32754
Joined: Sun Jun 17, 2012 9:08 am
Location: Canada
Contact:

Re: Ricko 1/18 Vector W8 rebuild and improve WIP

Post by [KRAFTIG] » Sat Apr 22, 2017 4:19 am

Nice video sir! Love the sun glasses hinge engineering ;)

User avatar
jim010
Posts: 24
Joined: Sat Sep 13, 2014 11:14 am

Re: Ricko 1/18 Vector W8 rebuild and improve WIP

Post by jim010 » Sat Apr 22, 2017 6:34 am

I always thought the tires and rims too small for the model.

User avatar
Zondaracer
.
.
Posts: 425
Joined: Wed Feb 04, 2015 8:11 am
Location: Friesland, Netherlands

Re: Ricko 1/18 Vector W8 rebuild and improve WIP

Post by Zondaracer » Sat Apr 22, 2017 7:20 am

jim010 wrote:I always thought the tires and rims too small for the model.
I took the liberty of loaning Kraftig's picture of his red Vector and comparing it with the real car:
Image

As far as I can see (and measure) wheels and tires are fine. They just look smaller because the model is sitting too high (and perhaps the shitty chrome). The rear wheels on the model also need more offset, sitting too deep makes them look smaller. Quite sure my model will look awesome with the correct stance.
Last edited by Zondaracer on Sat Jul 01, 2017 5:25 pm, edited 1 time in total.

User avatar
jim010
Posts: 24
Joined: Sat Sep 13, 2014 11:14 am

Re: Ricko 1/18 Vector W8 rebuild and improve WIP

Post by jim010 » Sat Apr 22, 2017 12:30 pm

You sure? The rear tires look fatter on the real car.

Do you plan on making the bonnet open?

Your attention to detail is incredible, so whatever you do will be amazing.

User avatar
Zondaracer
.
.
Posts: 425
Joined: Wed Feb 04, 2015 8:11 am
Location: Friesland, Netherlands

Re: Ricko 1/18 Vector W8 rebuild and improve WIP

Post by Zondaracer » Sat Apr 22, 2017 4:11 pm

jim010 wrote:You sure? The rear tires look fatter on the real car.

Do you plan on making the bonnet open?

Your attention to detail is incredible, so whatever you do will be amazing.
Yes you're right about the rear tires. They should have been slightly bigger. On the model front and rear are both 35mm in diam. The real tires converted to 1/18 scale are front 35,3mm (perfect), but the rear 36,6mm. The rear tires are indeed 1,6mm undersized. But this is all to the wall height, the wall height on the model tires is both front and rear 5mm. The real tires converted to 1/18 scale give a wall thickness front of 6,3mm and rear 7mm. I am quite sure this would look like balloon tires on the model, so I understand the modelmakers to compensate for scaling down. This applies also to the width of the tires. On the model they are exaggerated. On the real car front is 255, rear is 315, the model tires converted to real size give front 288mm and rear 333mm. The wheel size itself seems slightly bigger than the real ones. 16 inch is 22,6mm in 1/18 scale, but model wheel size is 25mm. But this is measured from edge to edge, which is not the correct way of finding a wheel size (wheel size is the rim, so the small tire retaining edges must be distracted).
I can try to wrap a bit of tape tape around the rear wheels, to stretch the rear tires a bit. Might make them look bigger, even 1mm would look different. Thanks for pointing out.

Concerning the bonnet, are you referring to the front piece? I do not intend to make that openable, I just want to change the profile of the wind guide plates as I pointed out in the video. I intend to have this model finished before winter time, so stick to the above todo list. I also intend not do do all sorts of work that will be invisible when it is finished as I have done on the GT90. Still gutted about the gearbox not being visible through the mesh. That was a lot of work.

User avatar
jim010
Posts: 24
Joined: Sat Sep 13, 2014 11:14 am

Re: Ricko 1/18 Vector W8 rebuild and improve WIP

Post by jim010 » Sat Apr 22, 2017 6:21 pm

You may have stated this somewhere else, but what sort of glue do you use for :

Diecast metal to Diecast metal

Plastic to diecast metal

And what sort of filler do you use?

I intend to replicate what you do here, so I am eagerly awaiting your next step!

User avatar
Zondaracer
.
.
Posts: 425
Joined: Wed Feb 04, 2015 8:11 am
Location: Friesland, Netherlands

Re: Ricko 1/18 Vector W8 rebuild and improve WIP

Post by Zondaracer » Sun Apr 23, 2017 5:40 am

jim010 wrote:You may have stated this somewhere else, but what sort of glue do you use for :
Diecast metal to Diecast metal
Plastic to diecast metal
And what sort of filler do you use?
I intend to replicate what you do here, so I am eagerly awaiting your next step!
Great initiative! Playing with these diecasts is a great hobby. It's not just modding, but what I really enjoy is the research. I spend hours on internet searching for movies and pictures. Sometimes I enlist to a forum group of car owners and ask for specific pictures or details of the car I don't understand.
Concerning your questions, these are the fillers I use:
Image
For small imperfections (shallow dents in the diecast or in plastic parts) I use the Revell model putty. Bigger repairs are with the 2K polyester putty. This stuff dries within 3 minutes, so needs to be applied quick. But when dry sands down perfectly and is stronger than the 1K Revell putty. If I need more drying time, I use the 2K Milliput. It's a sort of artificial clay and I have used this for example for modelling the exhaust, air intakes and light holes on the Zonda. Many modders use it for spoilers, fenders etc. It can be modelled for at least 30 minutes and you can use brushes, sticks and water to smooth it. Takes at least 24 hours to dry.
Last bit I use is a jar of metal dust I have collected from previous modded diecasts. I mix this with superglue and apply to difficult edges. It's a last save if you have gone too deep with your Dremel. I have used this on the air intake edges on the Zonda and decreasing the mirror holes on the GT90. Dries quickly and hard to sand down.
All mentioned fillers can be used on plastic or metal.

Concerning glues, I use these ones:
Image
Left is superglue. I hate it, but can be useful for quick building. Ofcourse strong and quickly drying. I use it mainly at the start of building a model.
Middle is a clear PU glue. I use this a lot in the final build. I dries clear, doesn't run and stains can be removed with alcohol and starts drying after about 8 minutes. It's my preferred glue but total drying time is at least 12 hours and not as strong as superglue. But it is perfect for aligning parts, does not attack paint or clear parts. And the best is, when the part is sitting I can remove remaining glue with a bit of alcohol (I use a coctailstick with a piece of kitchen paper wrapped around the tip). This way you can glue invisible the most difficult parts on a painted body (check out the vanes on my Zonda model). Also the glue for bonding the windows (or sticking the mirror to the window).
Right is a 2K PU glue and it's the best and strongest I know. I use this for difficult situations as mating body parts, suspension or highly stressed areas. After mixing can be used for at least 30 minutes and needs to dry 24 hours. I have used this stuff on my kitcar and even fixed a leakage on my washing machine. It's space age stuff. After drying can be sanded, but it's very hard.
All mentioned glues can be used on plastic, metal, plastic to metal etc. Just realise the strongest bonds are material to material. I have had stuff come loose only to realise there was paint in between and the glue had ripped the paint loose. Esspecially for high stressed areas, remove paint and rough it up with a bit of sanding.

As a tip:
Image
EVERYTHING that comes in a metal tube with a plastic cap will dry out once you punch the tube open. This is due to the solvent vaporing through the plastic cap and drying out the paint, glue or kit within 3 months. The bastard chemical companies have doing this trick for ages, so you have to buy their stuff frequently. Beat them with this trick, take a piece of aluminum foil and stick on the end before putting the cap on again.

Good luck with your builds and ofcourse put your blog on here.

User avatar
jim010
Posts: 24
Joined: Sat Sep 13, 2014 11:14 am

Re: Ricko 1/18 Vector W8 rebuild and improve WIP

Post by jim010 » Thu Sep 28, 2017 1:54 am

Been quiet on here. Any updates?

User avatar
Zondaracer
.
.
Posts: 425
Joined: Wed Feb 04, 2015 8:11 am
Location: Friesland, Netherlands

Re: Ricko 1/18 Vector W8 rebuild and improve WIP

Post by Zondaracer » Thu Sep 28, 2017 2:30 pm

jim010 wrote:Been quiet on here. Any updates?
No nothing to report yet. Will start working on this model soon, but at the moment still working in the shed on my Midas roadster. Hope to finish a few jobs before it gets too cold.
Although had the Vector a few times in my hands this summer and just keep seeing more flaws. Also trying to get to line up all body panels is a mess. It's going to be very difficult to give this model the same stance and appearance of the real car.

Post Reply

Return to “Custom Models, Repairs & Parts Development”